Con l'ausilio di un piccolo circuitino, veramente semplice da costruire (un integrato e qualche saldatura), possiamo anche controllare le luci e dispositivi esterni tramite MAMEHOOKER un software che permette la gestione degli OUTPUN in MAME.
Per il momento mi occuperò esclusivamente dei controlli analogici e come interfacciarli correttamente per essere letti dal MAME.
Piccolo riassunto dei collegamenti possibili con la SMARTASD:
Ax............Segnali ANALOGICI (compreso A+)
Dx............Segnali DIGITALI
Ex.............Segnali DIGITALI con la possibilità di gestire i segnali in quadratura per le trackball, gli spinner e gli encoder in genere.
GND.........Comune classico
+5V...........+5Volt
I file di installazione SOFTWARE li trovate qui:
Software di installazione e settaggi
Runtime necessaria per l'installazione della SmartASD
EXTRA script MAMEHOOLKER:
Script da caricare su MAMEHOOKER
Considerando che io dovevo interfacciare:
- Un pedale acceleratore CON POTENZIOMETRO
- Un volante OTTICO A 360 gradi
- Vari switch per i crediti e altro.
Ecco i miei collegamenti dedicati con la SMARTASD e i relativi pin (e possibile seguire la mia numerazione per arrivare ai miei stessi risultati e comprendere meglio gli screenshot successivi...ma non è strettamente necessario seguire questo ordine):
POTENZIOMETRO PEDALE :

- A+ : va collegato un'estremo del potenziometro
- A0 : oppure A1 o A2 o altri a seconda della disponibilità
- GND : va collegato all'altro estremo del potenziometro
GENERANO IL SEGNALE A0 NELLA FINESTRA DI CHECKING DELLA SMARTASD

IL SEGNALE DI USCITA LO ANDREMO AD IMPOSTARE SELEZIONANDO IL PIN A0 DALLA SEZIONE RULES

Per il pedale io ho impostato un asse Y del JOYSTICK 2 diciamo che è ottimo per i giochi di guida.
Abilitiamo la rules con il flag ENABLED.
Le regole possono essere caricate al volo tramite riga di comando dal nostro FRONTEND prima del lancio dell'emulatore, esempio:
ESEMPIO:
c:\SmartASD\SmartASD.exe c:\SmartASD\configurazioneSALVATA1.dat
EVITARE SPAZI NEL PERCORSO, METTERE IL PERCORSO COMPLETO DEL FILE
Esattamente andremo ad utilizzare le USER FUNCTIONS di ROCKETLAUNCHER
Brevemente le USER FUNCTIONS ci permettono di eseguire un comando o file in apertura o chiusura di un SINGOLO emulatore oppure GIOCO, dipende dal nove del file e dalla cartella di quale emulatore si trovano; un'immagine vale più di mille parole, ecco un'esempio di radice in cui annidare i files con lo stesso nome della roms, per lanciare comandi differenti come nel mio caso il cambio di script della SMARTASD.

Qui sotto un'esempio di codice all'interno di un file AHK
; Code in this file will only be run for the game whose name matches the filename of this file and whose system name matches the folder name this file is located in
; Do not change the line with the class declaration! The class name must always be GameUserFunction and extend GameFunction
; This is just a sample file, you only need to implement the methods you will use the others can be deleted
class GameUserFunction extends GameFunction {
; Use this function to define any code you want to run on initialization
InitUserFeatures() {
RLLog.Info(A_ThisFunc . " - Starting")
RunWait, C:\SmartASD\smartasd.exe C:\SmartASD\BreakoutMouse.dat, , Hide
RLLog.Info(A_ThisFunc . " - Ending")
}
; Use this function to define any code you want to run in every module on start
StartUserFeatures() {
RLLog.Info(A_ThisFunc . " - Starting")
; INSERT CODE HERE
RLLog.Info(A_ThisFunc . " - Ending")
}
; Use this function to define any code you may need to stop or clean up in every module on exit
StopUserFeatures() {
RLLog.Info(A_ThisFunc . " - Starting")
; INSERT CODE HERE
RLLog.Info(A_ThisFunc . " - Ending")
}
; Use this function to define any code you want to run before Pause starts
StartPauseUserFeatures() {
RLLog.Info(A_ThisFunc . " - Starting")
; INSERT CODE HERE
RLLog.Info(A_ThisFunc . " - Ending")
}
; Use this function to define any code you may need to stop or clean up after Pause ends
StopPauseUserFeatures() {
RLLog.Info(A_ThisFunc . " - Starting")
; INSERT CODE HERE
RLLog.Info(A_ThisFunc . " - Ending")
}
; These functions can be used to run custom code at certain points in each module
; This function gets ran right before the primaryExe
PreLaunch() {
RLLog.Info(A_ThisFunc . " - Starting")
;RunWait, C:\SmartASD\smartasd.exe C:\SmartASD\BreakoutMouse.dat, , Hide
RLLog.Info(A_ThisFunc . " - Ending")
}
; This function gets ran right after the primaryExe
PostLaunch() {
RLLog.Info(A_ThisFunc . " - Starting")
; INSERT CODE HERE
RLLog.Info(A_ThisFunc . " - Ending")
}
; This function gets ran right after FadeInExit(), after the emulator is loaded
PostLoad() {
RLLog.Info(A_ThisFunc . " - Starting")
; INSERT CODE HERE
RLLog.Info(A_ThisFunc . " - Ending")
}
; This function gets ran after the module thread ends and before RL exits
PostExit() {
RLLog.Info(A_ThisFunc . " - Starting")
RunWait, C:\SmartASD\smartasd.exe C:\SmartASD\ConfigGiochiMame.dat, , Hide
RunWait, C:\SmartASD\SmartASD.exe -enc 4, , Hide
RLLog.Info(A_ThisFunc . " - Ending")
}
; This method gets ran right before Bezel is draw on the screen
PreBezelDraw() {
RLLog.Info(A_ThisFunc . " - Starting")
; INSERT CODE HERE
RLLog.Info(A_ThisFunc . " - Ending")
}
; Game Specific Functions
; Use this method to set fullscreen after the game is running (Used by PCLauncher only)
; Use this function if fullscreen mode can only be set AFTER the game is running
SetFullscreenPostLaunch(fs) {
RLLog.Info(A_ThisFunc . " - Starting")
; INSERT CODE HERE
RLLog.Info(A_ThisFunc . " - Ending")
}
; Use this method to set fullscreen before the game is running (Used by PCLauncher only)
; Use this function if fullscreen mode can be set BEFORE the game is running, if fullscreen mode is set through CLI then this should return the cli switch necessary to run it windowed or fullscreen
SetFullscreenPreLaunch(fs) {
RLLog.Info(A_ThisFunc . " - Starting")
; INSERT CODE HERE
RLLog.Info(A_ThisFunc . " - Ending")
Return ""
}
; Use this method to write any code necessary to halt the game so that Pause can be supported (Used by PCLauncher only)
HaltGame() {
RLLog.Info(A_ThisFunc . " - Starting")
; INSERT CODE HERE
RLLog.Info(A_ThisFunc . " - Ending")
}
; Use this method to write any code necessary to restore the game so that Pause can be supported (Used by PCLauncher only)
RestoreGame() {
RLLog.Info(A_ThisFunc . " - Starting")
; INSERT CODE HERE
RLLog.Info(A_ThisFunc . " - Ending")
}
}
VOLANTE OTTICO 360:
Per il volante ci sono 2 segnali in quadratura più un GND e l'ALIMENTAZIONE che bisogna verificare se sia 12v o 5v (nel mio caso 5v e posso prenderla direttamente dalla SmartASD)
Io ho verificato i cavi che entravano nella scheda jamma e li ho fatti arrivare direttamente alla SmartASD:
- GND : alla GND della SmartASD
- STEERLING DIRECTION : E3A (va benissimo anche un'altro ExA)
- STEERLING CLOCK : E3B (va benissimo anche un'altro ExB)
- 5V : 5V della SmartASD
GENERANO IL SEGNALE ENC3 NELLA FINESTRA DI CHECKING DELLA SMARTASD

IL SEGNALE DI USCITA LO ANDREMO AD IMPOSTARE SELEZIONANDO IL PIN ENC3 DALLA SEZIONE RULES
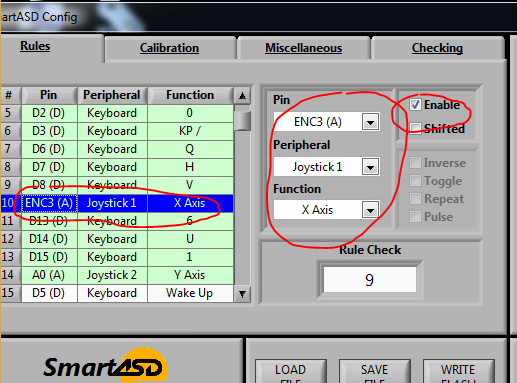
Per il volante io ho impostato un asse X del JOYSTICK 1 diciamo che è ottimo per i giochi che richiedono un ritorno al centro (non proprio per i volanti a 360)....ma rimane un'ottimo compromesso.
Per il giochi che utilizzano il PADDLE come ARKANOID invece dobbiamo settare un MOUSE asse X.
Altra soluzione possibile per evitare di ruotare un volante 360 gradi finche non si trova il centro e quella di impostare MOUSE ma in forma ASSOLUTA, che ci permetterà di trovare immediatamente il centro ad ogni rotazione opposta del volante.
Abilitiamo la rules con il flag ENABLED.
Le regole possono essere caricate al volo tramite riga di comando dal nostro FRONTEND prima del lancio dell'emulatore, esempio:
c:\SmartASD\SmartASD.exe c:\SmartASD\configurazioneSALVATA1.dat
OUTPUT PER LA GESTIONE LUCI E RUMBLE:
Per la gestione delle luci e il rumble...insomma tutti gli output di cui avete bisogno, avete a disposizione SOLO (la gran parte delle volte sufficienti) 8 INGRESSI e di conseguenza 8 USCITE
Io le ho usate nella maniera seguente:

E1A : Output per luce ROSSA lato Destro
E1B : Output per luce BLU lato Destro
E2A : Output per luce GIALLO lato Destro
E2B : Output per luce ROSSA lato Sinistro
D1 : Output per luce BLU lato Sinistro
D2 : Output per luce Pulsante OPZIONI\ARMI
D3 : Output per luce Pulsante CHANGE VIEW
D4 : Output per RUMBLE (Vedi schema post su questo blog)
GND : Connessione al GND della SmartASD
RICORDATE DI COLLEGARE IL PIN 10 AI RISPETTIVI 12V, E IL PIN 9 AL GND
Fatto questo dovrete selezione per tutti i PIN UTILIZZATI, l'opzione OUTPUT nella sezione MISCELLANEOUS nell'interfaccia della SMARTASD.

PULSANTI DIGITALI E MICROSWITCHES:
Per tutti i pulsanti classici ossia quelli dotati di micro (compreso il cambio), potete tranquillamente settare i valori e collegare i fili nei connettori con Dx oppure Ex
Nel prossimo articolo capire come tarare i vari controlli analogici e vedere come effettivamente ESCONO dalla periferica, infatti il percorso che fanno i nostri segnali è il seguente (dall'alto verso il basso):
CONTROLLO JAMMA (cavi in uscita dal volante, pedale,ecc...) >
INTERFACCIA ENCODER (SmartASD) >
PERIFERICA WINDOWS (Effettivo risultato della calibrazione in windows) >
CONTROLLI MAME (Assegnazione dei controlli tramite il menù TAB del mame) >
CONTROLLI GIOCO SPECIFICO (Comportamento nel gioco dei valori dati nel MAME tasto F2)